
The instant approval payment gateway using sardine.ai infrastructure may redirect your customers back to your website after payment using iframe. However, the default security settings including specifically the X-Frame-Options header, often restrict the ability to embed your site in iframes from different domains. In this comprehensive guide, we’ll explore two approaches to allow iframes on your WordPress or WHMCS site: one option using the .htaccess file and the other leveraging a dedicated plugin for WordPress.
Part 1: Modifying .htaccess for iframe Freedom
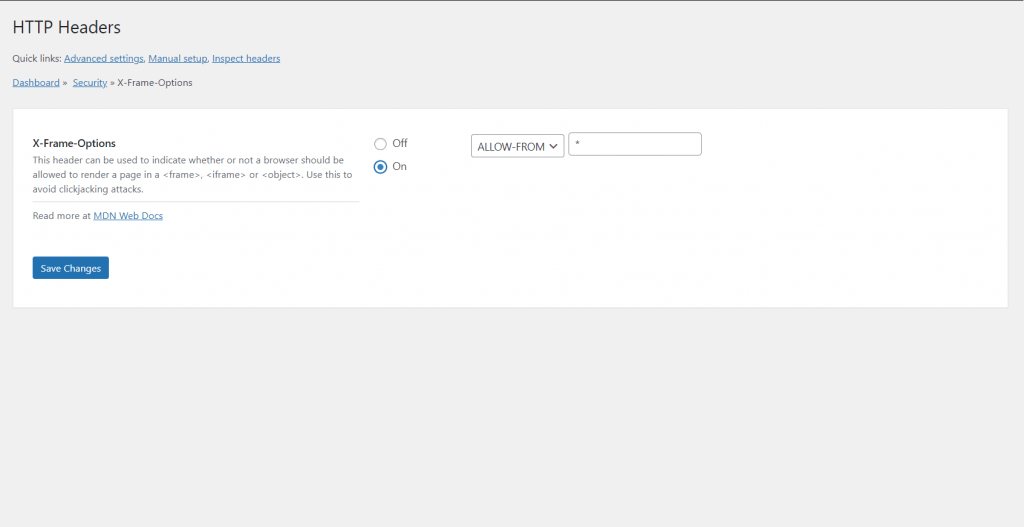
Understanding X-Frame-Options:
The X-Frame-Options header is a security feature implemented by web browsers to prevent clickjacking attacks. By default, WordPress and Apache servers sets this header to “SAMEORIGIN,” restricting the site from being embedded in iframes from different domains.
Steps to Allow iframes:
- Access Your Server:
- Log in to your server using FTP or a file manager provided by your hosting provider.
- Locate the .htaccess File:
- Navigate to the root directory of your WordPress or WHMCS installation and find the
.htaccessfile.
- Navigate to the root directory of your WordPress or WHMCS installation and find the
- Edit the .htaccess File:
- Open the
.htaccessfile in a text editor and add the following lines at the end:Header always append X-Frame-Options "ALLOW-FROM *"
- Open the
- Save and Upload:
- Save the changes and upload the modified
.htaccessfile back to your server.
- Save the changes and upload the modified
- Verify the Changes:
- Visit your WordPress site and check whether it can now be displayed in iframes on other domains.
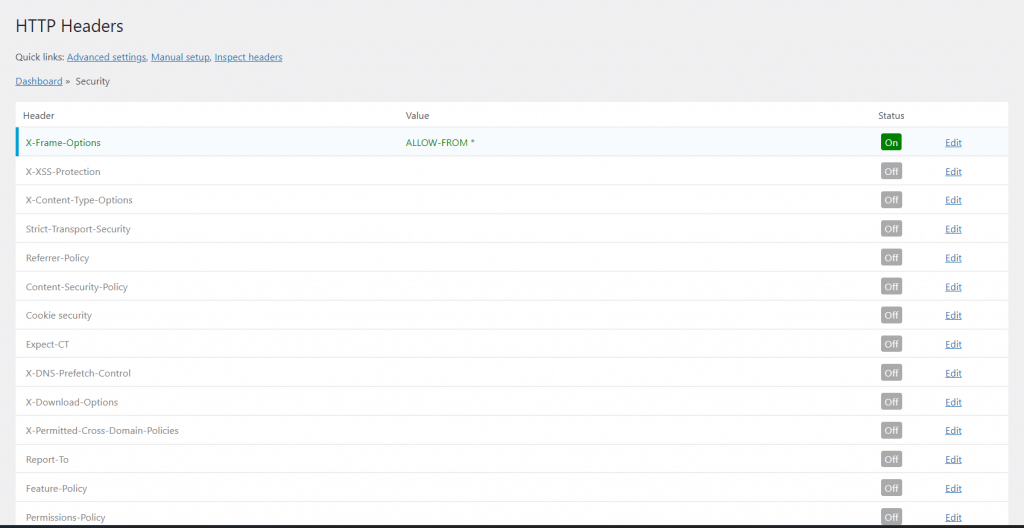
Part 2: Using a Plugin for iframe Compatibility
Introduction to Plugins:
For users who prefer a non-technical solution, WordPress offers a variety of plugins that can simplify the process of allowing iframes. Download the plugin here.
Recommended Plugin: “Allow Iframe Embeds”:
- Install the Plugin:
- In your WordPress dashboard, navigate to “Plugins” and click “Add New.”
- Search for “HTTP Headers” and install the plugin developed by WordPress Plugin Contributors.
- Activate the Plugin:
- Once installed, activate the plugin to enable its functionality.
- Adjust Settings:
- Depending on the plugin, you may need to visit its settings page to configure iframe options.
- Some plugins offer granular control, allowing you to specify which domains are allowed to embed your site.
- Make sure to set X-Frame-Options to allow all by inserting *
- Save Changes:
- Save any changes you make to the plugin settings.
- Verify Compatibility:
- Test your site by attempting to embed it in an iframe on a different domain.

Conclusion:
Whether you choose to modify the .htaccess file manually or utilize a plugin, unlocking iframe compatibility for your WordPress site is essential for expanding its reach and integration capabilities. However, it’s crucial to balance this flexibility with security considerations.
By following the steps outlined in this guide, you can confidently choose the method that best fits your preferences and technical expertise, ensuring a smooth and secure iframe experience for your WordPress site.